by Ken Smith Jr. - US4303 - February 1988
| The following is the construction method I used to build wood strip masts with
aluminum luff tube. The luff tube is an extrusion with the slot from Sailing Specialists.
It comes in thirty foot lengths. I cut the length in half and put no tube on the bottom
foot or so of the mast. If someone is making their masts with 16 feet of luff tube, you
may be able to find a deal on the other fourteen feet-with no degradation on your mast
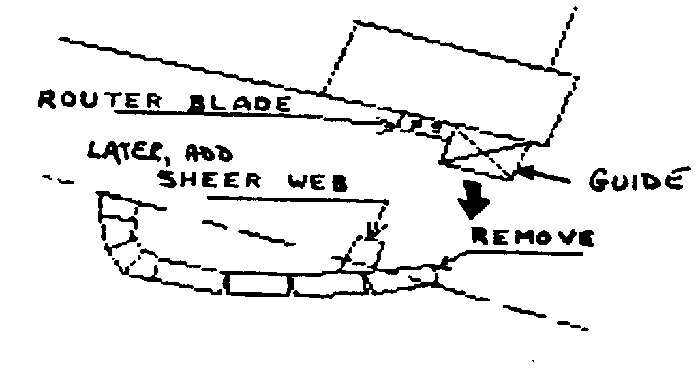
performance. Mast halves were built over a Norton spar, using car wax as a parting compound. I picked the portion of the spar to give the finished shape I wanted. It turned out that I taped a strip of wood to the mast about 3/4 inch form the luff slot with electrical tape, waxed that tape and built four halves, waxing again before each start. All my strips wore 3/4 x 5/16 inch. I split a number of strips in half with a saw set at 70 degrees and used these half-strips on the nose and for the sheer web. Sitka and ash were as the strips were scarfed. I prepared the scarf and made the glue joint at the same time as the masts were laid up. After experimenting, the fastest way to lay up the masts seems to be to line up all the strips for a half on the work bench, edge up and apply thickened epoxy to the edge with a plastic squeeze bottle. (Miss Clairol dye applicator bottles worked and were easy to clean and reuse, $1.69 ea) Lay the strips onto the form. and hold with rubber bands made form an old inner tube. My bench is built like a ladder 12 feet long. I tied the bands around the form and a rung, and around just the form past the end. I worked alone. but two more hands would have been helpful. The glue joint may not be full. I filled these areas as the next to last step when covering the outside with 4 oz glass, putting the glass on with the filler cured just stiff. With a hand plane, I shaped the leading edge and fixed the final taper. The 5/16 strips meet with almost the same thickness as the luff tube will make. I planed the leading edge strip so it would mate with the other mast half, dry fit the halves and held with my rubber strips. Using a combination square with two movable pieces Ss a caliper, I noted how much more material to remove every six or eight inches. and worked with a plane until both halves fit with the taper I wanted. For the trailing edge, first I made a jig with a router, a piece of furring strip and two clamps and routed off the trailing edge half the luff tube diameter. See diagram. With a little rough sanding, the insides are ready for reinforcement schedule. I used 4 oz glass. eight 1 in. carbon tows staggered like the Gougeon plans against the leading edge joint in each half. I used four tows like the Gougeon plans on the sides. No carbon on the tail. Using my double combination square set at 3-7/8", I held the luff tube and strip tight against the squares, and held the strip in place by drilling small holes and using toothpicks as dowels about every two feet. I lifted the strips up and under them to glue in place. There was that no clamps were needed. (See Figure) I next dry fit the halves with the luff tube laying in its soon-to-be final location. The luff tube had been drilled with holes on 4'- centers, countersunk with as large a bit as would fit through the slot. Several additional holes were placed at 2' centers at the top and bottom. Using a small bit, pilot holes were then drilled in the sheer web with the mast and luff tube straight and held against one side of the groove. Both halves are drilled. Then. using a hand plane, the sheer web is planed using these holes as guides for the final shaping operation on the inside. Taper was again checked, and the reinforcement schedule was planed back to the wood as needed. The halves were then glued together, using a few toothpicks as guide dowels through the sheer web-only in low stress areas. (Top, bottom, hound and 1/4 from bottom to hound). If it isn't straight at this point, it will never be. so make sure it is straight when doweled and glued. The luff tube was installed by drilling the pilot holes, lading a healthy bead of filled epoxy in the corners, setting the rough sanded luff tube in place, and setting the screws with the epoxy still wet. Don't let the mast sag! bland plane and fair the outside to the luff tubs, final sand and apply 4 On cloth to-the outside. Mount hardware and sail. Time: Two months working an hour or two a day plus four eight hour days. Cost for two masts with enough carbon. epoxy and glass left for about two more: $485.11 (not counting epoxy fillers, tools, shop heat and sandpaper) |